


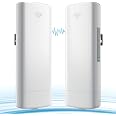
Wireless Bridge, 5.8G 100Mbps Point to Point WiFi Bridge Outdoor,1.8 Mile Transmission Distance, with 14DBi Directional Antenna, 24V PoE Adapter, for Extended WiFi Network Video Surveillance Range
Description
🌐 Bridge the gap, own the range—wireless freedom unleashed!
- LONG RANGE MASTERY - Cover up to 1.8 miles (3 km line-of-sight) with crystal-clear signal strength and minimal interference.
- BLAZING 5 8 G HZ SPEED - Experience up to 100Mbps Ethernet throughput for seamless HD video and data streaming.
- PLUG PLAY SIMPLICITY - Effortless bridge pairing without complex GUI setup—get connected in minutes, not hours.
- EXPAND YOUR DIGITAL DOMAIN - Extend WiFi to remote buildings or outdoor cameras, saving on costly wiring and subscription fees.
- RUGGED OUTDOOR RELIABILITY - IP65-rated weatherproof design keeps your network live rain, dust, or freeze—built for all seasons.
The CPE71C Wireless Bridge operates on a robust 5.8GHz frequency with a powerful 14dBi directional antenna, delivering up to 100Mbps Ethernet speed over distances up to 1.8 miles in outdoor environments. Its IP65-rated weatherproof design ensures reliable performance in harsh conditions, while simple dial-up pairing eliminates complex setup. Ideal for extending WiFi networks to remote locations and supporting outdoor surveillance without costly wiring.


Reviews
T**E
Got it working after a little trial and error.
This is an update as I struggled at first to get it working. Directions are probably AI generated and then not edited to make sense. Lots of information, just unclear. Could be more clear to know which is the master unit and what it looks like when actually connected. My problem was that the signal cannot go through a window screen when I was testing it out. Once I pulled the screen, it connected to my barn which is about 800 feet from my house. Now that it is working, should be good and will mount it outside the house.
M**A
Comes preconfigured. Easy Setup. 1500+ feet effective.
Dec 20223 : 2 year use review :This set has worked flawlessly for 2+ years continuously. Been through extreme Central Texas heat, 2 major freezes, heavy rains : & didn't disconnect even once. Just ensure it is mounted very firmly on the pole (or your exterior wall etc - higher up, the better). I am planning on setting this to connect to 2 more 'slaves'. So 1 master supplying internet to 3 slaves. Great for installing security cameras to remote corners of the farm - by using small solar setup.Aug 5, 2021 : (when 1st installed)I needed to bridge 2 houses 1500 feet apart at my farm. It was quite easy and straightforward. Just use the "preconfigured" method, instead of the GUI etc. I used 50 foot CAT6 network cables both sides, to take them up on the roof of the 2 houses.1st, I powered the 2 up in the same room (both next to each other), simultaneously squeezed the RESET button on both - which caused them to pair. When the blinking green light turns solid green - it means they paired successfully.Next - I tested their connection while both still in the same room ... MASTER connected to the Internet Router, and SLAVE connected to my laptop. The Internet was successfully beaming across the 2!!...now came the part of mounting the 2 at top of the two separate houses, 1500 ft apart. Which I did. Made sure the 2 devices faced each other ...though they don't have to PERFECTLY face each other.They easily "connected" at that distance of separation .... took about 2 mins to re-connect, after I reconnected to POE power at the other house.One little drawback to be careful about : the 2 green lights on the side are REALLY DIM. So dim, that when out in the bright daylight, they don't appear lit at all. For a while I thought the devices were not powering up - perhaps due to faulty cable. But then I cupped my hands around the lights and peered in - and saw the light WERE actually lit.At the second house - I connected the LAN output on the small black power/POE adapter - to a WIFI router. So this second house now is fully WIFI Internet connected. Working perfectly.One little 'trick' I used - that I believed helped get a stronger signal. I had an old "leftover" dish antenna on top of the second house. I turned it around to face the MASTER house, and placed the SLAVE device at the focal point of the dish.
B**W
Good Product - Horrible Instructions
I wanted internet in a detached garage without running buried cable. This product is one of several I considered. For the money, I decided to get this.Here’s what I think each person should know before buying it:1. Instructions are terrible, the company knows it and say they are working on improving them but, maybe I should go ahead and make a YouTube video they can use. What? No.2. The power is provided for each unit by a wall wart type plug that accepts Ethernet cables. One is for power and data to the unit so make sure your cable is capable of PoE. The other cable goes from the plug to the router.3. The unit at the house which goes to the modem for your internet service is considered the “Master” and the switch is set to AP from the manufacturer. Check that before mounting it to save yourself some hassles. The other unit is the STA setting for “slave” or “station”. This is the unit on the out building.4. There are no mounts.5. Disregard the 12V power plug inside the unit, you don’t need it, it’s not supported and you wouldn’t want to use it because that would mean having AC near each unit.6. There is a small reset button inside the unit that also selects different channels to use. Make sure each unit is on the same channel.7. If both lights on the unit are illuminated and NOT blinking the units are paired.8. These should be plug and play. If it doesn’t work you probably don’t have them paired correctly, have the AP/STA switches backwards or have a bad cable.These were a pain to get working because the company has terrible directions. The company did send a prompt reply via email support but by then I had it working.Hassle up front but now clear and fast internet in the shop.
Common Questions
Trustpilot
2 months ago
3 weeks ago
